Install the Print Agent
Run the local service near the printers, approve its tenant pairing, and verify that configuration and printer discovery are healthy.
Download an agent version
Every published version remains available for new installations and assisted rollbacks.
Show all versions (15)
What the agent does
The Print Agent connects local printers to Chemilla Labels. It synchronizes templates and images, receives tenant-scoped jobs, renders labels to PDF, and sends them to the operating-system print queue.
Install it on a machine that stays online and can reach every printer it is expected to manage.
- Installers are available from the workspace for Windows x64, macOS on Apple silicon, and Linux x64.
- The desktop application exposes status, settings, local jobs, detected printers, and local logs without requiring command-line access.
- The local tenant name confirms which workspace the agent is paired with.
Download and pair
- 1
Download the stable agent
Use the version list above; for a new installation choose the release marked Latest.
- 2
Install and start it
Use the machine that can reach the intended printers. Keep the agent running while pairing.
- 3
Open the exact onboarding link
When the agent shows a link or pair code, open that exact request while signed in to Chemilla Labels.
- 4
Review the request
Select the tenant and verify hostname, platform, version, and fingerprint before approval.
- 5
Approve
Optionally name the service account, then approve. The agent can now register printers and receive jobs for the tenant.
Read agent state
| Signal | Meaning |
|---|---|
| Runtime: online | The service is currently reporting to Labels. |
| Runtime: unknown | No current runtime state is available; check the process, network, and last-seen time. |
| Active | The desired state allows the agent to work. |
| Paused | The desired state is stalled; resume it before expecting new work. |
| Config: applied | The desired runtime configuration has been acknowledged. |
| Config: pending / failed | The new settings are waiting for acknowledgement or could not be applied. |
Update runtime configuration
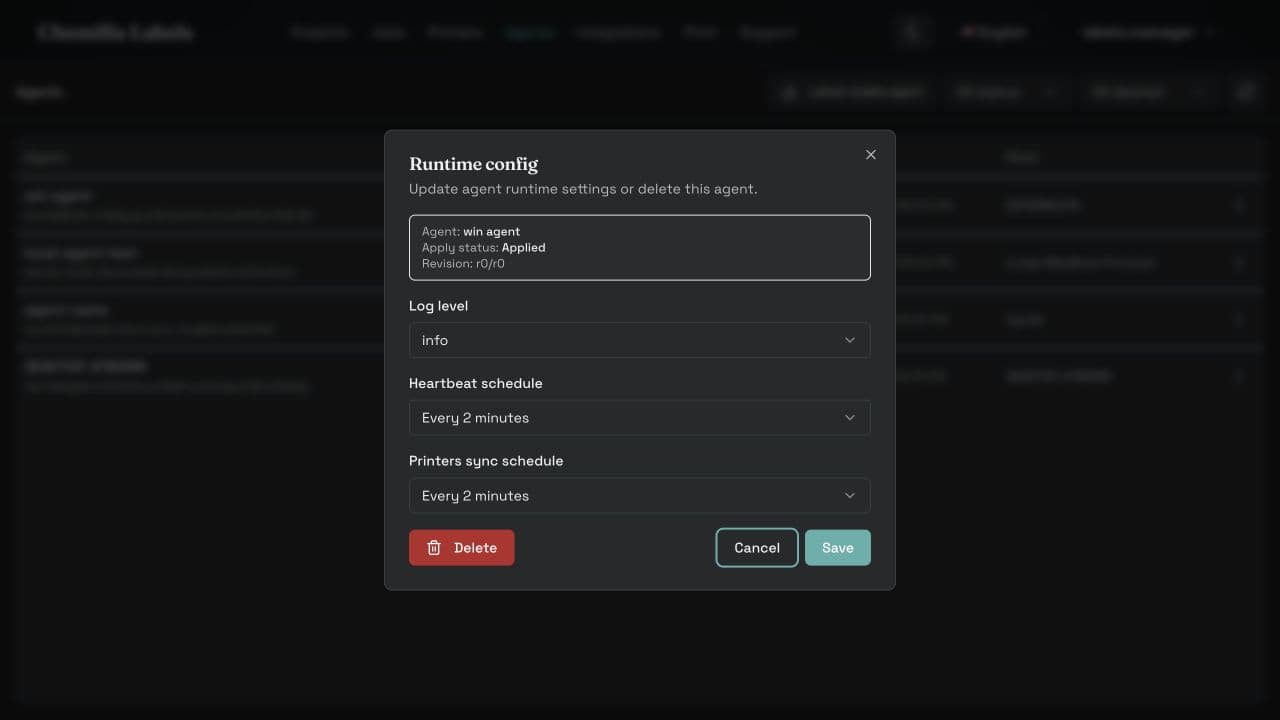
Choose Config on the agent row to change log level, heartbeat schedule, or printer synchronization schedule. Saving queues a desired configuration revision; the status changes when the agent acknowledges it.
More frequent schedules improve freshness but produce more synchronization traffic. Keep the default two-minute cadence unless a specific operational need justifies a change.
Use the local Agent application
Open the desktop application on the agent machine for local diagnostics. Status shows runtime health and updates; Settings exposes maintenance and storage actions; Jobs provides previews and generated files; Printers shows discovery and server state; Logs provides copy, refresh, and log-folder actions.
- Printer availability for remote jobs is controlled only from the Labels web workspace. The local application displays that server-managed state as read-only.
- Local job files can be inspected or revealed on disk. Deletion is limited to completed jobs that have already synchronized.
- Use Check for updates or the update prompt when a newer stable agent is available.
Five-minute diagnosis
Follow this order: each step checks a different layer and shows where to intervene, without reinstalling blindly.
- 1
Test the printer from the operating system
Confirm it is online and print a test page directly from Windows, macOS, or CUPS. If this fails, fix the driver, queue, network, or print support first.
- 2
Open the local Agent
Check that Status shows a healthy runtime. If the application does not open or remains offline, continue with the operating-system procedure below.
- 3
Check the local service
Open http://127.0.0.1:49210/health on the Agent machine. The response must identify chemilla-label-agent, generation 2.
- 4
Verify the workspace path
The Agent must be online and Active, configuration Applied, and the printer both detected and enabled. Wait for one synchronization cycle and refresh the pages after a change.
- 5
Send one copy
Use a known template and a one-copy test job. Check its state in Jobs and the local application before checking the physical output.
Windows
- Download the Windows x64 installer from the version list and run it as the user who will operate the Agent. If Windows SmartScreen intervenes, continue only after confirming that the file came from the official Labels site.
- If installation is incomplete, fully quit the Agent from its notification-area icon and run the same installer again. Restarting Windows clears any process left open.
- Open Settings > Bluetooth & devices > Printers & scanners, select the printer, and print a test page. The Agent can use only queues that are visible and working for the same Windows user.
- Check that the firewall, proxy, or antivirus allows outbound HTTPS to Labels and does not block the application. Local port 49210 must be free.
- If the Agent opens but does not appear in the workspace, complete or repeat onboarding and approve the request in the correct tenant.
Invoke-RestMethod http://127.0.0.1:49210/health
Get-NetTCPConnection -LocalPort 49210 -ErrorAction SilentlyContinue
macOS
- Download the Apple silicon DMG, open it, and move Chemilla Labels Agent to Applications. Start the application from the Applications folder, not directly from the DMG.
- If macOS blocks the first launch, confirm that the file came from the official Labels site, then use System Settings > Privacy & Security to allow it.
- Quit the Agent from its menu-bar icon before reinstalling or changing version; closing only the window leaves it running.
- Open System Settings > Printers & Scanners and print a test page. Fix driver, queue, or network problems before continuing.
- If Status remains offline, check the local service and inspect logs from the application.
curl --fail --silent http://127.0.0.1:49210/healthLinux
On Linux x64 you can use either AppImage or the DEB package. AppImage supports automatic update checks and installation; DEB installations are updated by manually installing the new package.
- For AppImage, make the file executable, start it, and keep it in a stable location. Do not move it while the Agent is running.
- For DEB, install the package with APT; if it fails, read the package manager error before retrying.
- Use CUPS to confirm that the printer is present, enabled, and correctly configured. A CUPS test print must succeed before testing from Labels.
- If the application does not start, run it once from a terminal to read the error and confirm that local port 49210 is free.
- Check that the proxy and firewall allow outbound HTTPS to Labels.
chmod +x Chemilla-Labels-Agent_*_linux-x64.AppImage
./Chemilla-Labels-Agent_*_linux-x64.AppImage

# Or install the DEB package
sudo apt install ./Chemilla-Labels-Agent_*_linux-x64.deb

curl --fail --silent http://127.0.0.1:49210/health
lpstat -p -d
Updates, reinstall, and rollback
- Windows, macOS, and Linux AppImage check signed updates automatically. The package is verified before installation and the Agent restarts when installation completes.
- If an update fails during installation, reopen the Agent and inspect version, status, and logs before retrying. The previous runtime is retained for automatic backend recovery.
- For a manual rollback, download the agreed release from version history, fully quit the Agent, and install it. On Linux DEB explicitly install the selected package; with AppImage replace the file only after quitting the application.
- If reinstalling is not enough, uninstall only the application, restart the machine, and install a known-good release. Use Installed apps on Windows, the Applications folder on macOS, and the package manager or AppImage removal on Linux.
- Do not manually delete data, configuration, credentials, logs, or caches during routine recovery. Do so only with support: you may lose tenant pairing and useful diagnostic information.
What to collect for support
- Operating system and version, Agent version, and installation format.
- Agent ID and name, selected tenant, exact printer name, and operating-system test-page result.
- Job ID, state, and reason shown by the workspace, including date, time, and time zone of the attempt.
- The local /health response and log lines from shortly before to shortly after the error.
- Never send passwords, client secrets, tokens, API keys, or the complete local database.